Facial toner is one of those skin care products that seems created for the purpose of selling you yet another expensive thing to apply to your lovely epidermis.
However, it really does lots of amazing stuff to improve your skin health!
Facial toner helps to restore the normal pH of your skin so healthy bacteria can grow, while also gently tightening the skin to reduce the appearance of fine lines and wrinkles.
"What?? It does all of that? Where can I get some?”
It’s available everywhere, but I’d highly recommend making your own!
Commercial or store-bought toners have several drawbacks in that they are expensive and often full of gross stuff like dyes, stabilizers, additives, and even hydrogenated oils (yuck).
They also tend to be quite harshly astringent and a one-size-fits-all-skin-types strength, which just isn’t the case.
Making your own facial toner is super economical, free of crap, and is customizable to your skin type. Win-win-win!
Check out my video to learn:
- How to make your own super fabulous, medicinal facial toner (it’s so squeaky clean you can drink it — trust me, I’ve done it and it’s delicious)
- The specific benefits of using apple cider vinegar as the base of your toner
- Why lavender and chamomile are such amazing herbs for your skin
- How to use your toner (including bonus uses!)
- My super simple trick for a toner-on-the-go solution if you need to freshen up during the day

Get the Complete DIY Guide to create your own facial toner
Create your own natural facial toner and get bonus tips and ideas! This printable guide lays it all out, step-by-step, along with the full DIY Facial Toner recipe.
Show notes:
I hope you enjoyed the video!
I realized later that I didn’t do a very good job describing how to use your facial toner! So, here you go!
How to Use:
Lightly soak cotton facial pads with toner and apply to your face and neck once in the morning and once at night. Be sure to use it after you’ve washed your face, if that is part of your skincare routine.
BONUS TIP #1: The toner is also a very effective make-up remover. Be careful around your eyes, as vinegar can sting a little. Try applying the toner to a Q-Tip, then removing eye make up.
BONUS TIP #2: If you need a toner touch-up during the day, presoak the cotton facial pads with your toner and store in a small glass jar. Throw the jar in your bag and voila! Refreshing toner on-the-go!
Links I mentioned in the video:
Jump to the facial toner recipe by clicking here (you'll be redirected to YouTube); or you can advance this player to 21:55
My Top 5 Tips for How to Pick a Great Probiotic
The Herbal Medicine-Makers Handbook by James Green
Pubmed article on the benefits of alpha-hydroxy acids
Full Video Transcript
Why buy a facial toner when you can make it?
Today we're going to talk about how to make your own chamomile, lavender and apple cider vinegar toner. It's super affordable and your skin will love it.
Using vinegar has been around for centuries. It's known that Hippocrates used to use vinegar extractions of herbs and he is considered the father of medicine in the western world and was alive during the time about 460 B.C. So, it's been used for a millennia for not only internal issues going on with people but external.
Vinegar has a lot of really fabulous components that are great. Lots of nutrients and minerals as well that are great internally, but today we're going to focus on the external and that DIY facial toner we talked about.
I just want to clarify too, when I talk about vinegar, especially here, and I mentioned it in the intro, I am talking about this stuff.
This is the brand that I like the most: Bragg's raw apple cider vinegar.
You can see that it has the mother tincture, which is all this lovely cloudy stuff on the bottom. Those are the really great probiotics and cultures sort of grown in here.
I specifically love it for facial toners because we get this lovely, natural flora from the vinegar place back onto our skin, which is fantastic among all the other benefits of the vinegar.
I'm not talking about white vinegar or super concentrated acetic acid, which I think most people think about when they think about an acne spot treatment and that's way more concentrated than what's actually in this vinegar.
It's only about 5% acetic acid and that's not even the best component of it and why we like it for skin stuff.
So, I really recommend the Bragg's raw apple cider vinegar to get all of these wonderful nutrient-dense components as well as the lovely probiotics that are in the bottom there.
I did just do a video on probiotics. If you guys want to check it out, I'll put it in the notes here for this video.
Also, quick note, if you want to jump right to how I made this, you can also look in the description down below and I'll have a little link there so you can jump ahead in the video, if you'd rather skip all of this good stuff or go back and forth, see how it's made, come listen to this part. Whatever you want to do, it's totally fine.
So, looking at the vinegar and skin, specifically vinegar and skin health benefits here. So, alpha-hydroxy acids are a big one for skin health. There's been a lot of research come out on them recently.
You can even see skin products that are specifically geared toward advertising alpha-hydroxy acids on them. That's kind of the main component they're promoting, which it seems to rotate a lot with skincare products.
There's argon oil and then there is chamomile and then there is whatever the newest cool thing is.
So, alpha-hydroxy acids are fantastic. The one that you mainly find in apple cider vinegar is from malic acid, which is from apples, because apple cider vinegar is really just fermented apples. That's all it is.
That's why it does count as a fermented food, which I mentioned in my probiotic video, which is really where you want to start to rebuild your own natural flora, both on your skin and in your GI.
The GI mirrors the skin. So, if you've got issues on the skin, usually there's something internal going on. Little bonus tip for today.
Oftentimes treating the GI can help quite a bit and that's why fermented foods and products are so wonderful for the skin as well.
Topically is great, but really what's going on internally is super important too and needs a little bit help there, if you're noticing difficulties.
Why are these alpha-hydroxy acids so amazing? So, first, they are an exfoliant, so they literally break up the bond between dead skin cells. They're able to be washed away more easily, which is pretty cool, which we definitely want in our facial toner.
Then they will increase collagen and elastin production, which is amazing. That is what we really need in our face, if we're concerned about getting wrinkles or we've had a lot of sun damage that it kind of breaks down the collagen over time.
Collagen will decrease in the connective tissue and skin as we age to begin with. So, anything that we can do to kind of increase that is going to minimize the appearance of wrinkles and fine lines.
So, Apple cider vinegar, fabulous stuff for that. Then we're also looking at decreasing age spots and scars with this apple cider vinegar, which is really neat, from the alpha-hydroxy acids. All of this has come out in a recent PubMed article, which I thought was really cool.
There's a lot of really fabulous stuff that just that the alpha-hydroxy acids do for your skin, and of course, apple cider vinegar is a very natural way to get it. I love that it's complexed with everything else that's going on in there with other nutrients and minerals, probiotics.
It's not just a chemical component that somebody's decided, "Wow, this is helpful for the skin. I'm gonna strip it out of its natural place, put it in this cream that has all this weird stabilizing stuff in it and hope that it works for people."
I think getting it the natural way is a much, much better way for it to work for you and you'll get better results.
Then I wanted to talk a little bit about the pH of the vinegar overall. So, the pH of the vinegar is about 3. So, it's on a scale of 0 to 14 and the closer you get to zero is more acidic, and then the higher, the closer you get to 14 is more basic.
The idea with a facial toner is that it balances out what happens after we put soap on our skin. There's a lot of information out there nowadays too that maybe soap isn't the best way to clean your skin or oil cleansing is really fabulous.
If you haven't heard of that, I would totally check it out. Great. Even if you have oily skin, there is different oils that you can use, but it's a really nice, natural way to cleanse things without disrupting the bacterial balance on your skin. Of course, that's super important.
So, when we get that bacterial balance disrupted, that's when we get overgrowth of things and we get clogged pores or we get acne, we get infections, that type of thing.
The more we can keep that great probiotic content or natural flora content in check on the skin where the good guys are growing high and they're kind of crowding out the bad guys, the better it's going to be for overall skin health.
Soap usually has a pH of about 8 or 9, and our normal skin pH is about 5. So, you can see that when we use soap, we increase the pH of our skin. Usually, pathogenic bacteria prefer a more alkaline environment. So, that's when they're able to overgrow. It's essentially almost like using an antibiotic on your skin by using soap.
I'm not usually a big fan of using lots and lots of soap in general on the skin. So, because it's harsh and it strips, not only does it mess with the bacteria, it strips all of our natural oils, which can be a really big component of having an issue with oily skin, where if we're stripping it all down in this natural kind of sebum coat that keeps our skin healthy and keeps those bacteria flourishing, the good ones, we're stripping that off, then we're allowing bad organisms to grow, the bad bacteria.
Then we're also increasing oil production, because if we're stripping it all down, our skin is like, "Oh my gosh. I don't have this protective coat anymore and now I need to overproduce it."
So, then, that is a contributing factor with oily skin as well as diet, of course, and overall health. It's really important to maybe minimize that soap use.
The toner will help to bring your pH back to normal, but again, not a huge fan of the really scrubbing off the face with a harsh soap especially. So, the toner will help to bring the pH back to normal.
The toner's also astringent. I think this is kind of the main quality that people know about the toner. I think one that we've all had experience with is witchhazel. It's very, very astringent. It will pull the life out of your skin.
I don't necessarily recommend witch hazel as a great toner. To work, it doesn't have to be harsh. We kind of think, "More is better. Oh man, if I really feel it and it's pulling and it's drying, it's really working."
That's true, but I also think that that can be really helpful for people with oily skin, but what about people with dry skin?
Sometimes toners really aren't very customizable or individualized. It's kind of like a one size fits all whereas with this recipe, we're going to dive into how to customize it to your skin type, which is really wonderful.
So, if you've got dry skin already, that really dry intense strong herb is too much, and vinegar is kind of a nice middle ground where it is a little astringent.
It's going to kind of pull out some extra moisture. It actually helps to decrease the size of your pores as well if you're concerned about that. You'll notice it less and less the more that you use facial toner.
The astringent is really lovely. It's very anti-inflammatory. Vinegar has been used as a compress for headaches but also for fever because it actually reduces the feeling of heat on the skin. So, it's really nice and cooling and soothing that way.
And again, it's much more mild, astringent than something like witchhazel.
Then we've also got antiseptic properties of vinegar. So, it's wonderful in that it keeps that pH to a better spot, so then that pathogenic bacteria does not overgrow and the good stuff is able to flourish.
There's not a lot of research on, "Well, does it spare the good guys or does it just hurt the bad guys?" We don't actually know, but I think that overall we know that vinegar, the apple cider vinegar especially is wonderful for skin health.
So, I would guess that it's really helping those good guys grow, especially with the good probiotics in it and counteracting the growth of the bad guys.
Again, the growth of bacteria anywhere in your body, your GI, your skin, it's all about real estate.
You got the good guys and the bad guys and it's all about who has the balance at that time. If the good guys growing up and they're taking up more space than the bad guys, the skin stays healthy.
If the bad guys overgrow, you end up having issues with skin health, with oiliness or acne, eczema, psoriasis — things like that.
So, that's kind of a nice overview of why vinegar is so great.
Then facial toner, in general, it's a nice thing to add to your skin care routine. As we talked about, it'll help balance the pH after soap. It'll help balance the pH of your skin anyway.
And again, this is a fully customizable recipe for you to see what skin type matches the best with which recipe for you, which we'll get to in a second here.
So, let's move on to talking a little bit more about the herbs themselves that I chose.
Why did I choose these? I think we've heard a lot about lavender and chamomile in general for skin products, but they share a lot of the same qualities that I really, really like in terms of helping the skin out.
So, these properties not only apply to the skin, but also internally, which is why I love that. So, lavender, I've got a little sample here, so we can see the dried lavender buds as well, and then chamomile.
This is what dried chamomile looks. These little tiny, tiny lovely flower buds here and they smell really good right here.
It's nice. I get a little nervous during the video sometimes, so now I've got some very calming and soothing herbs right in front of my face.
So, calming to the GI and nerves right there. Lavender and chamomile are both anti-inflammatory. Lavender is especially amazing for burns, sunburns, bug bites, bee stings, anything like that. It can really, really take down the skin irritation very quickly.
Chamomile is similar as well. Maybe not quite as well researched in those specific applications, but it's wonderful. Very, very soothing.
So, of course, if we've got some acne going on, the herbs are really going to help bring down the inflammation there.
Then both herbs are antiseptic, which I think we don't really think about with lavender and chamomile, but they are pretty potent in terms of their antimicrobial activity.
And again, really bringing down that pathogenic bacteria so the good guys can grow, which, really important, again, for great skin health.
Just a little note about chamomile. Some people are sensitive to chamomile. It is part of the Asteraceae family, which is a really large family of plants, but just good to know that if you know you're sensitive to asters or Asteraceae, maybe skip the chamomile in this recipe.
The lavender itself will do wonders. It's really lovely and soothing. So, again, lavender, chamomile soothing to the GI and nerves.
It would be really nice just applying this to your face a couple times a day. Usually morning and night is a nice way to go, but it's going to be soothing to breathe in the chamomile, lavender that have been extracted in the vinegar.
And again, remember, we talked about whatever is usually good for the GI is good for the skin. So, we're kind of reflecting that back by using these herbs on our skin as well.
Then both are also anti-spasmodic. How does that relate to the skin? Well, what's important, I think, to think about there is if they're relaxing overall. If we got really tight facial muscles or we tend to hold our face in a specific pattern, and then create wrinkles and fine lines, that type of thing.
These herbs can actually help to relax those muscles, which is fantastic.
The vinegar is very high in potassium, which is also really important component for proper muscle contraction and relaxation. So, with these herbs, they can help to relax those facial muscles really nicely.
Then if you're having one of those annoying facial tick kind of things, definitely try some of this facial toner. It would be a great thing to add into your routine.
Usually, when you have kind of a facial tick that happens, like the corner of your mouth pulls, your eye twitches, that type of thing, that has to with the mineral deficiency.
So, these herbs are very rich in minerals. The vinegar is rich in minerals, and then the herbs themselves actually calm the nervous system and calm the nerves. That is going to apply to the nerves in your face.
So, just a nice little extra bonus if you have that annoying twitch kind of start to happen.
Okay. Lavender and chamomile. Let's move on to how to actually make this stuff.
So, you can see I messed up a little bit there. Sorry about that. Hopefully, it's pretty clear to read.
It's really, really straightforward and that's why I love this recipe is that you don't have to be a scientist. You don't have to be a chemist. It's really easy proportions to work with and it's super simple.
I mean, it probably takes about 10 minutes total to make it. 5 minutes up front, 5 minutes on the back end. That's it. And again, at the end of this video, I will walk you through exactly how to do that.
Here, I just wanted to give you a little quick overview of how it works. So, you literally just add the vinegar and herbs together.
You notice I haven't put any quantities on here, right? So, again, it's not super scientific.
That's why I love this method.
I'll show you exactly how to do it before, but I'm going to tell you right now, I did not measure my quantities.
I have rough estimates and that is just fine. If you want to get really scientific about it, that's great, but you don't have to, to make this work for you.
We can see that we shake daily for 10 to 14 days.
So, what I think is really interesting about this is we're extracting the herbs in the vinegar, which most recipes that you online have you make a tea with water and then you add the water and the vinegar, which we are going to do a little bit here as well.
I think it's great to do the herbs directly into the vinegar because you're getting a higher concentration there, because the vinegar is a lot less than making a cup of tea a lot of the time.
You'll see on our next sheet that it depends on your skin type — how much water you add.
So, if you're only adding a little bit of water, you're not getting as much of the herb in there as you would when you're extracting in vinegar.
Usually when you're extracting in vinegar, you do want to use a dried herb just because vinegar is not quite as good a preservative as alcohol.
Alcohol, you can use fresh plants and tinctures and that way and it's going to really keep everything clean and it would be very unlikely for something to mold or spoil.
Vinegar is just not quite as intense as alcohol, so things can kind of mold and spoil perhaps. That's why I have these dried lavender and the dried chamomile. Also remember that dried and fresh are different in terms of potency.
So, the dried is usually about three times as concentrated as the fresh, because the fresh still has all of its water content in there. If you are using fresh herbs, just make sure to look at that.
There's actually a different procedure for that too. I have a favorite book that teaches you how to make kind of some of these herbal compounds that I will link to in the description for you.
So, I'm specifically using dried here, which I would recommend. It's easier than the fresh just starting out. You can get these herbs at www.mountainroseherbs.com. I was able to get both of these just at my local grocery store. I have a great natural grocery store in their bulk herb section, and I'll put the link to Mountain Rose down at the bottom for you as well. They have great organic herbs that are pretty affordable.
So, that's all you're doing. You're just picking it up and shaking it for 10 to 14 days.
That's it. I mean, not the whole time. Once in a while throughout the day, just pick it up and shake it. That's all.
You're just kind of moving the herb around and they're making sure it's fully coated and all of it is getting extracted the way it can. Then you're going to strain it off, which is super simple.
Then you want to pour it into a clean container. And specifically, the containers I use do not have metal, because vinegar is acidic and it will eat through the metal. So, like a ball jar or a plastic cap.
I would not recommend using plastic at all for these because plastic can get eaten away by acidic stuff and vinegar is acidic. So, you really don't want your nice homemade facial toner to have a bunch of plastic crap in it; we're trying to make this as clean as possible and a lot of store bought toners too.
They have a lot of weird stuff in it. The lot of dyes and hydrogenated oils even and weird preservatives, that type of thing.
And again, when you put that stuff on your skin, you're having to detoxify it all out. So, really, just making your facial and skincare products as clean as possible is going to do your skin a great service, because then it's not having to get rid of all of the crap and figure out what it can use out of that little component that might not be crap in the facial toner and soap and makeup and all kinds of things.
Then we're going to dilute as desired as our last step here. I'll show you this handy little chart that shows you based on your skin type, this is about the dilution that you want to go for. So, for sensitive skin, we're going to use a little bit less vinegar and more water. These are just parts.
Again, it doesn't have to be a specific quantity, but maybe you've got a quarter cup of vinegar that you've made, so then you would use that one cup of water.
And then for normal to dry skin, we're going with about two to one ratio.
Then for oily skin, we're going to have the highest component of vinegar, because you need a little bit more of that astringent component to really take some of the extra oil off the top as a one to one.
So, again, the toners, it's just a really nice, lovely, easy thing to make and to do for yourself and save yourself some money. Those facial toners that you can buy in the store are no joke. Even the nice ones can be full of a lot of different weird things that are completely unnecessary and detrimental to skin health.
And again, with oily or sensitive or dry skin, the toner's going to help, but it really is about that internal environment and diet and lifestyle to look at those larger things, but really, lovely to do for yourself overall.
Okay. All right. So, I am going to show you how to make this!
Okay. We're here in my kitchen with everything we need to make this lovely apple cider vinegar, lavender and chamomile facial toner. Let me just run you through what I've got here.
Most of it is pretty explanatory, but I especially wanted to highlight this jar so we can see that it's all glass and it's got this lovely rubber gasket. On the top here, no metal is touching the vinegar or plastic, because remember plastic can degrade in acidic environment and apple cider vinegar is certainly acidic. Remember, it's about a pH of 3.
Then metal will rust with the acid, so things like ball jars and whatnot, not the best fit. So, definitely, I would go for a glass jar. We actually do need two of these.
I am using both of mine right now as one for demonstration and one that has been ready for about 10 days now actually. So, I'll show you that in a little bit.
Here's the lavender. We can see the lavender and chamomile, not totally equal, but they're each about a quarter of a cup. I'd say the lavender a little bit under a quarter of a cup and the chamomile is a little bit over a quarter cup here in my little ramekins.
So, we'll get started, you guys. This is super simple. Let me just show you. We're just going to dump right in here with the lavender and we're going to do the same thing with the chamomile. This is super pretty. All these little beautiful flower buds here and there we go.
We can see the lavender and the chamomile both in here. Let me just shake it to kind of even it out a little bit there.
Then we are going to take our vinegar and we're just going to pour it in. That is about it.
I'm going to pour here, so we can we got about half an inch maybe, three quarters of an inch line right there between the herb and the vinegar.
So, ideally, what we want to have is once all this herb is wet, we want to have about a quarter inch floating free of the herb. That's it.
That's all you have to do to measure. So, you're really just trying to soak the herb, leave a quarter inch free down here. That's it. So, let me grab my little spatula here.
I'm going to mix ... And we can see that the herb is starting to soak things up, especially those little tiny chamomile flowers. It takes a little bit for the herb to soak in.
What you're going to do here as well, you're going to let it sit for about 12 hours at first, and then you're going to check it and you're going to see how much is absorbed.
If the vinegar is completely absorbed, we need to add more, or if you're not up to that quarter inch mark.
So, this here, you can see it still looking pretty dry. There is a little bit more vinegar down there, but that's okay. We're going to add some more vinegar here actually.
That's all there is to it. Again, definitely not an exact science. Totally fine that it's not. If you want to get really scientific, go for it, be my guest, and remember as well that these flowers are really going to expand because they're dehydrates. So, they will soak this vinegar and get much bigger.
Okay, so here are my two jars. We've got on the left the one that I just mixed.
You can see all the vinegar there. I mixed it just a little bit longer with the flowers.
Remember, they are going to rehydrate and really absorb a lot of liquid. So, we're going to have way less vinegar down at the bottom here and then I just seal it off.
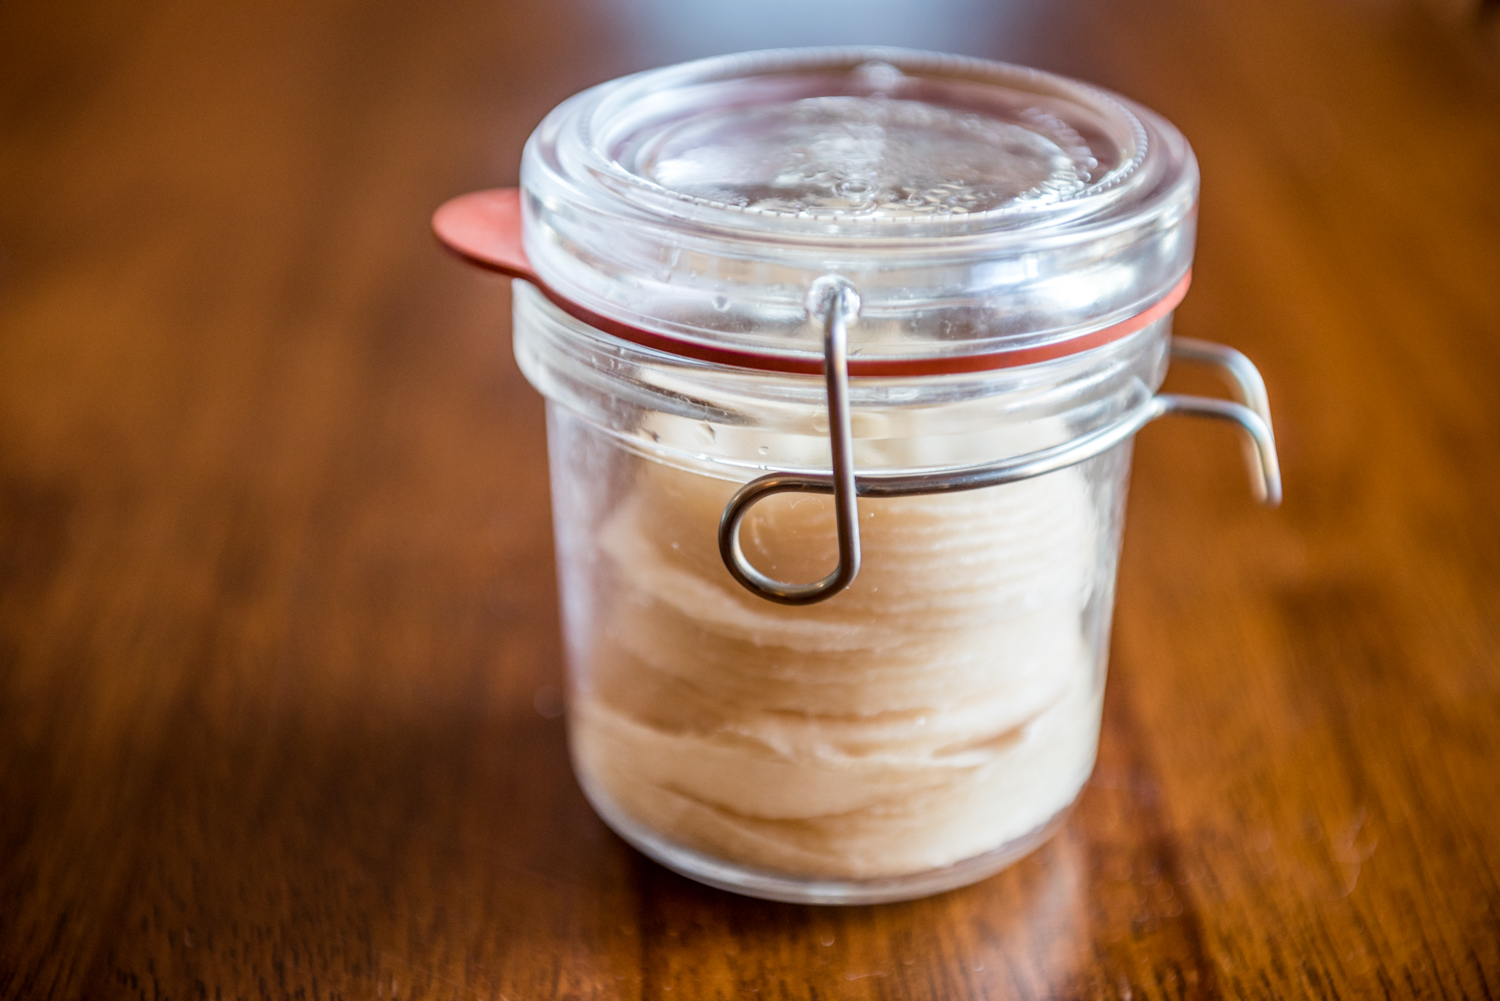
Then this is my guy who's been sitting for about 10 days. So, you can see the vinegar is at about a quarter of an inch. You can see a lot of the sediment from the chamomile flowers down in the bottom there. It's a little bit darker.
You can see all the strands, because I've shaken it up every day and that's really all you do to swirl. I just kind of swirl it around like this for a few seconds and then let it sit every day.
That's really all the maintenance there is to it. You can certainly move it a little bit differently if you want, but the point is just to saturate all of those flowers.
Okay. Let's move on to the straining stage.
Okay, so you can see I've got my facial toner ready to strain. Then I just have a little Pyrex cup that's about two cups and my cheesecloth all set up in here.
So, let's go ahead and pop this guy open. There we go. All right. We do actually want to use something as fine as a cheesecloth, especially with chamomile. We're just going to go ahead and pour this on in here, because chamomile has all these little, tiny flower buds that really, really break down.
So, in order to really get all that fine particulate out of there, it's best to use something really fine. If you don't mind the particulate and it's just going to settle at the bottom, okay, no worries. Not a big deal. I just like using a cheesecloth.
So, all right, we've got all our herb in here and we're just going to strain it out.
Oh my gosh, you guys. It smells so good. So good. I wish you could smell through the camera. We're just going to squeeze everything here as much as we can to bring out ... I don't know what I smell more, the lavender, the chamomile.
They're both really, really potent. Really beautiful. I have to say, too, squeezing this out and getting some of it on my fingers, I can feel that the vinegar, I guess I can say, is softened. It's a little bit less harsh.
Apple cider vinegar isn't too harsh to begin with, but it feels a lot softer and silkier on my skin. So, I'm really, really excited about this for the vinegar.
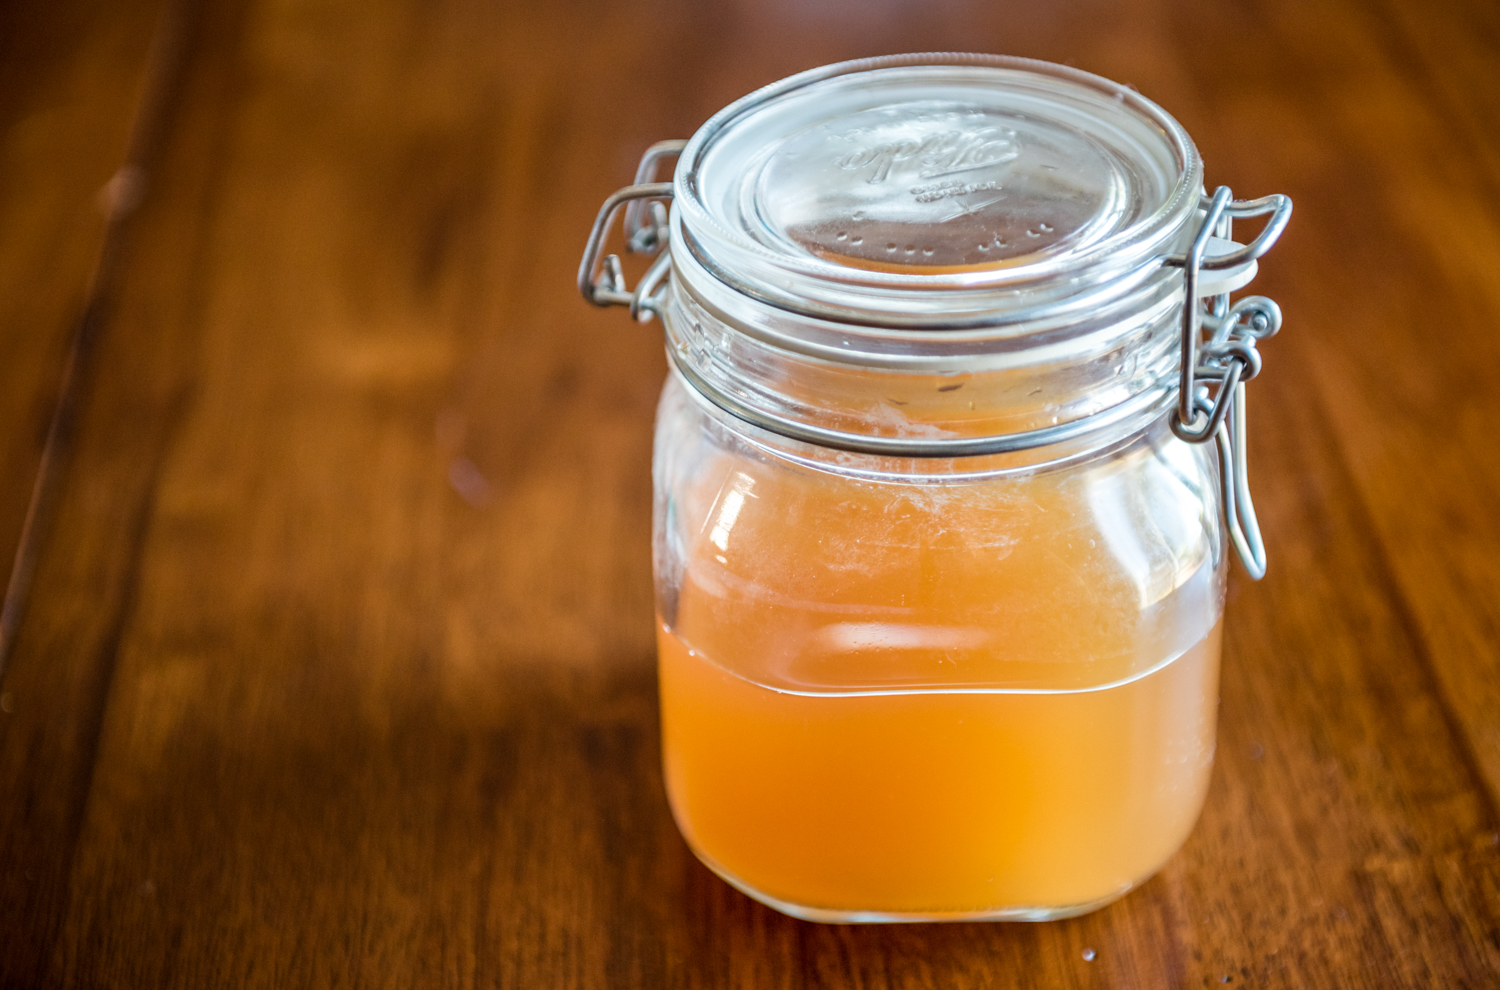
Okay. All right, guys. So, I just have to do a glamor shot. Look at that. Look at how pretty it is. It's dark and full of good stuff for your face. It's going to be awesome.
All right, so, I got my storage container cleaned and dried off here.
Then we can see that I've made just a little bit less than one and a half cups, so I'm actually going to pour just about one cup into my storage container. I'll go ahead and do that. Let's see where we are here. Perfect. Okay. So, we got one cup in there.
Then I'm going to do about two cups of water, because for me, my skin is right at about that dry/normal area. So, here's my two cups of filtered water. Perfect. All right. That is that. Y
ou have a homemade facial toner. Let me just seal this off. Great!
Full disclosure, guys, I tasted some and it's delicious as well. Side note, I would also really recommend labeling this. I have so many things in my drawers and cupboards that I have not labeled and then I'm like, "What's that? I have no idea."
So, I would definitely label it and put a date on it somewhere so you know how old it is, how long it's likely to keep its vinegar, its antimicrobial.
It's got antimicrobial herbs in it. It really should keep for a fair amount of time, I would say, at least six months or a year, because this is a fair amount of facial toner to use. So, that is that.
Okay, bonus tip time. So, I diluted the remaining half a cup back up to about one cup, because again, for me, that normal to sensitive, normal to dry skin is a two to one.
If you have a sensitive skin, it's a four parts water to one part vinegar. If you have oily skin, one part water to one part vinegar.
So, I'm in about that two to one range. So, if you need some facial toning on the go, like you work out in the middle of the day or you go right to work after working out, there's this super cool thing where you can just preload a little glass jar with the cotton facial pads.
Then you can go ahead and presoak them with this stuff. It's pretty awesome.
So, there we go. We'll just get it soaked that way. You can shake it around too to get it soaked a little bit, but there you go. Facial toning on the go.
I'm going to put my cool little top on here so it's all sealed. There you are. It's a little cotton pads. Clearly, I didn't do a great job getting them all soaked up, but you have to wait a little bit for everything to soak in, and of course, it might be a little bit hard to dip into this with one of these cotton facial pads.
So, you can certainly put it in a smaller bottle, if you have a facial toner bottle already or buy another little one, but anyway, that is that. Thanks so much for watching.
One more quick note, I just wanted to wrap up by saying I really hope that this was helpful and empowering a bit and showing you how easy it is to make these things yourself.
You don't have to go spend a whole bunch of money to get a really nice quality facial toner. You can make it yourself right here for just a couple box with some apple cider vinegar and whatever herbs you want to use, I like lavender and chamomile. They suit me well. You can try and experiment with a whole bunch of different things, but it doesn't have to be difficult.
It doesn't have to be a lot of math or details. It's really just, "Eh, let's pour some in here. Let's use that much. Sure." That's the fun of home remedies is you make it your own.
You do your own thing. Whatever works for you is great.
Okay. Thanks so much for watching. Take care.